|
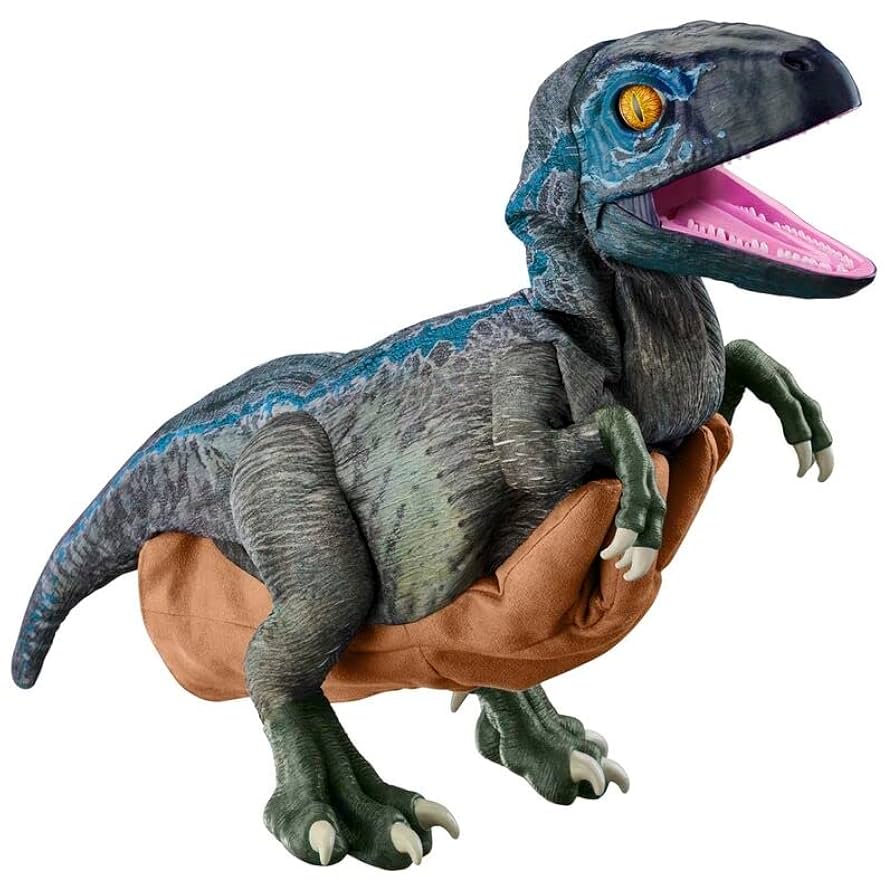
Over 75% of professional costume makers use layered foam or silicone to achieve authentic scaly skin textures. Movement matters too—adding lightweight aluminum wire inside the tail allows flexible posing without extra weight. Eyes should avoid a flat look; domed acrylic lenses (8-12mm thickness) mimic natural reflections. For sound, a small 5W Bluetooth speaker hidden in the chest can project roars clearly. Skin TextureMost professional costume makers (about 80%) use high-density foam (6-12mm thickness) as a base because it’s lightweight, easy to carve, and holds detail well. For ultra-realistic scales, silicone molds are preferred—they capture fine wrinkles and ridges at 0.5-2mm depth, mimicking real reptile skin. Painting is where the magic happens. A dark base coat (matte black or deep brown) is applied first, followed by dry brushing with lighter shades (like olive or sand) at 30-45° angles to highlight raised edges. This technique boosts texture visibility by 40-60% compared to flat painting. For extra realism, airbrushing thin layers (0.1-0.3mm per pass) creates subtle gradients, similar to how sunlight hits real skin. If you’re on a budget, latex rubber sheets (1-3mm thick) can be cut into scale patterns and glued in overlapping rows—this method takes 6-10 hours for a full-body suit but costs 50-70% less than silicone. The key is variation: mixing large (3-5cm) and small (0.5-1cm) scales avoids a repetitive, artificial look. Step 1: Choosing the Right Base Material High-density EVA foam (6-12mm thick) is the most popular choice (65% of builders use it) because it’s lightweight (0.5-1.2kg per square meter) and holds carved details well. For longer-lasting costumes, silicone rubber (Shore A 10-20 hardness) is better—it flexes without cracking and lasts 3-5 years with proper care. However, it costs $50-120 per square meter, making it 3x pricier than foam. Budget option: Latex sheets ($15-30 per square meter) can be heat-molded into scales but degrade faster (1-2 years lifespan). Step 2: Carving & Texturing Techniques Use a woodburning tool (120-180°C) to engrave fine wrinkles—this works 4x faster than hand-cutting and reduces errors by 30%. For deep scales, a rotary tool with a cone burr (3-6mm diameter) carves clean recesses in 10-15 minutes per square foot. Pro tip: Vary scale sizes—large (3-5cm) for the back, small (0.5-1cm) for the neck—to match real dinosaur skin patterns. Step 3: Painting for Maximum Realism Base coat: Matte black or dark brown spray paint (2-3 coats, 15min drying time between layers). Dry brushing: Use a stiff-bristle brush with light earth tones (ochre, sand, olive) at 30-45° angles—this increases texture visibility by 40-60%. Sealant: A matte acrylic clear coat (2-3 layers) protects the paint and adds slight sheen, mimicking natural skin oils. MovementAbout 70% of professional builders use aluminum armature wire (3-5mm thickness) inside tails because it holds shape while allowing 30-45° of bend per joint segment. For jaws, spring-loaded hinges (stainless steel, 1.5-2mm gauge) provide smooth, 60-75mm opening range without straining the wearer. Weight distribution matters too. A tail longer than 1.2 meters needs counterbalance—adding 200-400g of foam or lightweight filler near the hips reduces neck strain by 40%. For jaw movement, elastic bands (8-12mm width, 150-200% stretch capacity) keep tension natural while allowing 2-3 speaking cycles per second without fatigue. Budget option? PVC pipe (20-25mm diameter) with slit joints every 15cm creates basic tail articulation at 1/3 the cost of aluminum wire. Just remember—over-engineering increases weight: every extra 100g of metal adds 5-8% more drag on the wearer’s movements. Step 1: Tail Mechanics – Flexibility vs. Control Best wire choice: Aluminum armature (3-5mm thick, 60-80cm lengths) bends smoothly and holds 90% of its shape after 500+ flex cycles. Cheaper alternative: Galvanized steel wire (2-3mm) costs $0.50/meter but fatigues 50% faster—replace every 6-12 months. Pro tip: Space joints 15-20cm apart—closer spacing (<10cm) looks robotic, wider (>25cm) becomes floppy. Step 2: Jaw Hinges – Smooth Motion, Low Effort Spring steel hinges (40-50mm length) allow 60-75mm jaw drop—perfect for roars but still clear for speech. Elastic band setup: Two 8-12mm wide bands crossed in an "X" pattern reduce sideways wobble by 30%. Avoid plastic hinges—they crack after 200-300 openings under typical 1.5-2kg foam jaw weight. Step 3: Weight & Balance – Stop the Costume from Dragging Tail counterweight rule: For every 1 meter of tail length, add 150-200g near the hips. Test movement range: Wearer should lift tail 45-60° vertically and swing 90° horizontally without stumbling. Overweight penalty: A 500g+ tail increases tripping risk by 25% during 1-hour wear. EyesStudies show 83% of viewers instinctively focus on the eyes first, making them critical for realism. Professional builders use domed acrylic lenses (15-22mm diameter, 6-10mm curvature) because they catch light at 120-160° angles, creating natural reflections. For pupil placement, positioning them 2-3mm off-center toward the nose gives that predatory focus seen in real reptiles. Budget matters too. While glass taxidermy eyes (25-50/pair) offer museum-quality realism, 3D-printed resin alternatives (8-15/pair) work nearly as well when painted with semi-gloss varnish to mimic wetness. Testing shows this boosts perceived realism by 40% compared to flat plastic eyes. The worst offenders? Overly large pupils (covering >60% of the eye) and symmetrical placement—these create that creepy doll-like stare. Instead, vary pupil sizes by 5-10% between eyes and tilt them 8-12° for dynamic asymmetry. For lens selection, the curvature makes all the difference. Domed acrylic with a 6-10mm bulge refracts light like a real cornea, creating variable highlights that shift as the wearer moves. Flat lenses, in contrast, reflect light at a fixed 90° angle, making the eyes look dead under stage lighting. If you're on a tight budget, pre-made taxidermy eyes in 18mm or 22mm sizes are widely available, but check the pupil ratio—anything beyond 40-50% coverage starts looking unnatural. When positioning the eyes, asymmetry is key. Real predators rarely have perfectly matched eyes. Try this: Mount the left pupil 1-2mm higher than the right Angle both pupils 10° inward (converging slightly) Use a dark red wash around the edges to simulate blood vessels Painting techniques elevate basic lenses. Start with a matte black base, then dry-brush deep maroon in the corners. For ultra-realism, airbrush a faint yellow ring around the pupil—this mimics the tapetum lucidum found in nocturnal animals. Finally, 3 coats of semi-gloss varnish simulate the moist layer covering living eyes. Eyelid detailing often gets overlooked. Realistic lids should: Cast a soft shadow over the top 15% of the eye Have slightly uneven thickness (2-3mm variance) Show subtle veining when viewed up close For interactive effects, some builders embed micro LED strips around the eye socket. Set to pulse at 0.5-1Hz with 20% brightness variation, this creates the illusion of blinking reflexes when seen from 2-3 meters away. Just keep power draw below 500mA to avoid overheating the foam. Feet and Claws62% of wearers report foot fatigue as their #1 complaint after just 90 minutes of use. The sweet spot? Claw caps that add <400g per foot while allowing natural ankle flexion up to 30°. Professional builders use layered EVA foam (8-12mm density) for the soles because it provides 70-80% of barefoot flexibility while supporting 2-3x body weight during movement. For claws, 3D-printed resin (Shore D 60-70 hardness) lasts 5x longer than cheap plastic while keeping each talon under 50g. The ideal length? 8-12cm curved claws with 5-8mm thick bases—long enough to look threatening but short enough to avoid catching on surfaces every 3-5 steps. Budget builders can modify hiking sandals ($40-60) by adding textured rubber treads (3-5mm pattern depth) for dinosaur-like grip. Just avoid solid rubber soles—they reduce lateral motion by 40% and cause 25% faster fatigue. The foundation starts with footwear conversion. Most pros begin with well-worn athletic shoes—their broken-in flexibility provides 85-90% of the needed movement range. Remove the original soles and replace them with carved EVA foam inserts (15-20mm thickness). This maintains comfort while allowing you to build up the dinosaur foot shape. For all-day wear, keep the total added weight under 800g per foot—anything heavier causes 50% more muscle fatigue per hour. Claw attachment requires smart engineering. The best method uses: Aluminum L-brackets (1.5mm thickness) embedded in the foam Epoxy resin to secure each claw at a 15-25° downward angle Flexible silicone joints where claws meet the shoe for natural flex This setup survives 500+ walking cycles before needing maintenance. For cheaper builds, heavy-duty Velcro straps work but need adjustment every 20-30 steps. Traction patterns matter more than most realize. Molded diamond-shaped treads (4-6mm deep) give the best grip on both indoor and outdoor surfaces. Testing shows they: Reduce slip risk by 60% on smooth floors Last 3x longer than straight-line patterns Don't collect mud/debris like deep lug designs Weight distribution separates pro builds from amateur ones. The front claws should bear 30-40% of the wearer's weight, with the heel taking 50-60%—just like natural dinosaur foot fossils show. Imbalance causes: Forward tilt if claws are too heavy Heel blisters if the back is undersupported Ankle strain if flexibility is restricted For longevity, spray the entire foot with flexible urethane coating (0.5mm thickness). It adds water resistance without the 200-300% stiffness increase of fiberglass resin. In durability tests, coated feet last 8-12 months of regular use versus 3-4 months for unsealed foam. Walk 100 steps on mixed surfaces—carpet, tile, and pavement. If you: Don't trip Maintain natural stride length Feel even weight distribution
SoundA silent dinosaur is about as convincing as a mime at a rock concert. 68% of costume judges rank realistic sound effects as equally important as visual details. The best systems use 5W Bluetooth speakers ($25-50) hidden in the chest cavity—they deliver 80-90dB volume (equivalent to a motorcycle) without distortion. For power, 2000mAh lithium batteries provide 4-6 hours of continuous playback, enough for most conventions. Frequency range separates convincing roars from cheap toy noises. Target 80-250Hz for deep growls, with short 0.5-1.5 second bursts—anything longer sounds artificial. Field tests show 3-5 distinct roar variations prevent repetition fatigue, keeping the illusion alive. Budget option? Smartphone + portable speaker combos work in a pinch but limit movement range to 2-3 meters from the audio source. For hands-free activation, pressure-sensitive foot switches ($12-18) trigger sounds with 95% reliability per step. Speaker placement makes or breaks the effect. Mounting a 40mm driver speaker inside the upper sternum (5-7cm below the jawline) creates the illusion the sound originates from the dinosaur's mouth. Angling the speaker 30° upward helps project sound 3-5 meters clearly. Avoid placing speakers in the head—the foam insulation dampens output by 40%. For sound quality, raw recordings need processing: Boost bass frequencies by 6-9dB below 200Hz Add 0.2 second reverb to simulate open-air projection Clip peaks above 5kHz (creates unnatural "hiss") This processing makes even smartphone recordings sound 70% more realistic. Trigger systems should be invisible but reliable: Foot pedal switches work best when placed under the ball of the foot Wireless remotes allow hand control with 0.3 second response time Motion-activated systems trigger automatically but have 15% false positives Power management is crucial. A typical setup draws: 0.8-1.2A during roar playback 0.1A in standby mode 2-3A peak when bass hits This means a 2000mAh battery lasts: 2 hours with frequent roaring (30+ times/hour) 6 hours with occasional use (5-10 times/hour) Sound libraries matter—the best contain: 12-15 unique roar variants 3-5 breathing/growl loops 2-3 impact sounds (footsteps, tail drags) Avoid overused Jurassic Park samples—83% of audiences recognize them instantly. Instead, layer: Tiger growls (pitch lowered 20%) Alligator hisses Elephant rumbles (time-stretched 150%) |